My Tasks
 Overview
After the solution is installed, the My Tasks web part is added to a SharePoint page like any other web part. A new web part already works with sensible defaults, so you often only need to choose the data sources. This article describes how to add the web part, what each group of the property pane does and how to check the result.
Before you start
- The My Tasks solution is installed in the App Catalog and added to the site. See KB10035. How to Install a Vitextra Product in SharePoint Online. To install a new version of the solution, see KB10050. How to Update a Vitextra SPFx Solution in SharePoint Online.
- A tenant administrator has approved the API permission requests of the solution in the SharePoint admin center (Advanced > API access). See KB10303. My Tasks: Required Permissions, Privacy and Security.
- You can edit the page.
- You have a trial or a license. See KB10206. Vitextra Licensing and Account: How to Buy and Activate a License.
How to add the web part
- Open the SharePoint page where the list should appear and click Edit.
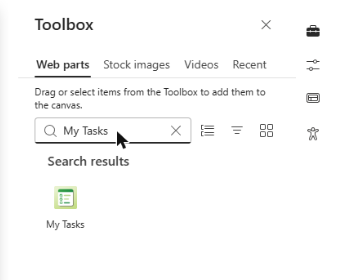
- Click the + icon in the place where the web part should be.
- In the search box, type My Tasks and select the web part from the results.
- Click the web part, then click the Edit web part (pencil) icon on its left to open the property pane.
- Choose the data sources and adjust the other settings (see below).
- Optionally click the title area and enter your own Web Part Title.
- Click Republish (or Publish) to make the page available to others.
📝 Note
The My Tasks web part can be placed in any section of a page. It also supports a full-width section and can be used on a full-page app page. In Microsoft Teams it works as a personal app and as a tab; see KB10301. How to Add My Tasks to Microsoft Teams.
The property pane
The settings are grouped in an accordion. Most changes are applied immediately without reloading the page.
| Group | What you set there |
|---|---|
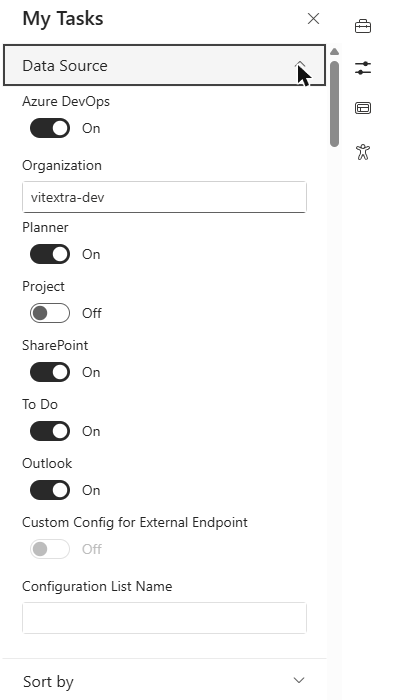
| Data Source | Toggles for Azure DevOps, Planner, Project, SharePoint, To Do and Outlook. The Organization field appears for Azure DevOps. |
| Sort by | The default sort column (Task Name, Created Date, Due Date, Source, Priority or Task Status) and the direction. |
| Row Limit | The slider Total number of results (5 to 50) and the toggle Enable Paging. |
| Appearance | The toggle Compact List. |
| Miscellaneous | Excluded Statuses (comma separated) and Auto refresh. |
| Columns | Which columns are shown and in which order. |
| About | License information. |
Data Source
Switch on every source whose tasks should appear. A new web part has Planner, SharePoint, To Do and Outlook switched on. Azure DevOps and Project are off. If all sources are switched off, the list is empty.
To show Azure DevOps work items, switch on Azure DevOps and enter the Organization: the name that you see in the address dev.azure.com/<organization>, for example contoso. Descriptions and requirements of all sources are in KB10290. My Tasks Data Sources: Planner, To Do, Outlook, SharePoint, Project Online and Azure DevOps.
Sort by, Row Limit and Appearance
By default the list is sorted by Created Date, newest first. The default page size is 10 tasks and paging is on. Change the number with the Total number of results slider. If Enable Paging is off, only the first page is shown. The Compact List toggle reduces the row height. Users can still change the sorting for themselves; see KB10293. My Tasks: Filtering, Sorting and Personal View Settings and KB10297. My Tasks: Paging, Row Limit, Auto Refresh and Instant Loading.
Miscellaneous
In Excluded Statuses (comma separated) enter the status names that should be hidden for all users, for example Completed, Deferred. The names must match the text of the Task Status column exactly. The Auto refresh toggle reloads the list every 60 seconds without a loading indicator. See KB10298. My Tasks: Excluding Statuses and Limiting the Task List.
Columns
Tick the columns to show and drag them up or down to change the order. See KB10294. My Tasks: Choosing and Arranging Columns.
About
The group shows the license status: trial (with the number of remaining days), active, expired, suspended or canceled.
❗ Important
The web part shows only tasks that are assigned to the person who views the page. If you see an empty list while editing, check that you are assigned to tasks in the enabled sources. A source that cannot be loaded, for example because an API permission was not approved, is skipped without an error message and the other sources still appear.
Check the result
- Save or republish the page and reload it.
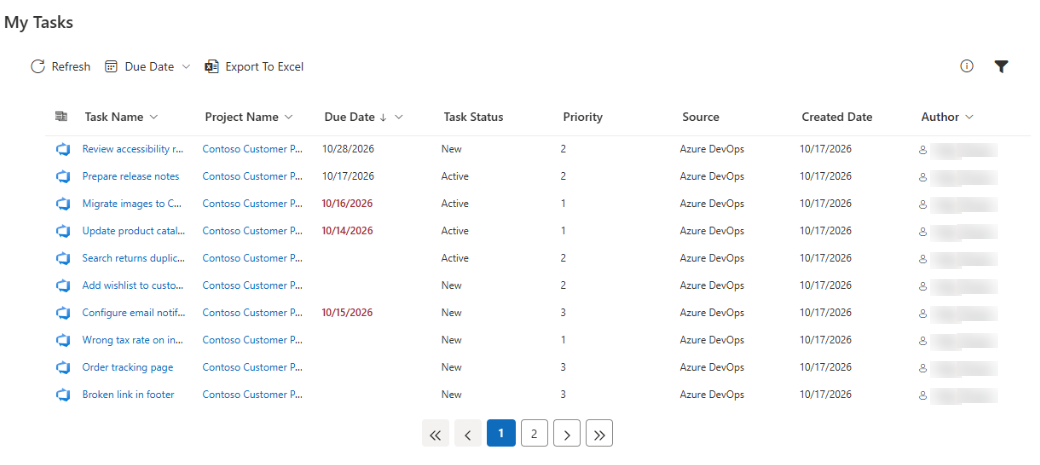
- Make sure that the tasks of every enabled source appear. The first column shows the source icon.
- Test the command bar: Refresh, the Due Date menu, Export To Excel and the Filter panel.
- Select a task and open Details to see its properties.
💡 Tip
You can add several My Tasks web parts to one page or to different pages, each with its own sources and columns. Each user's sorting and filters are remembered separately for every web part. For a short guide for your colleagues, share KB10291. My Tasks: A Quick Guide for End Users. If no tasks appear, see KB10307. Why Are My Tasks Missing or Not Loading?.