My Tasks
 Overview
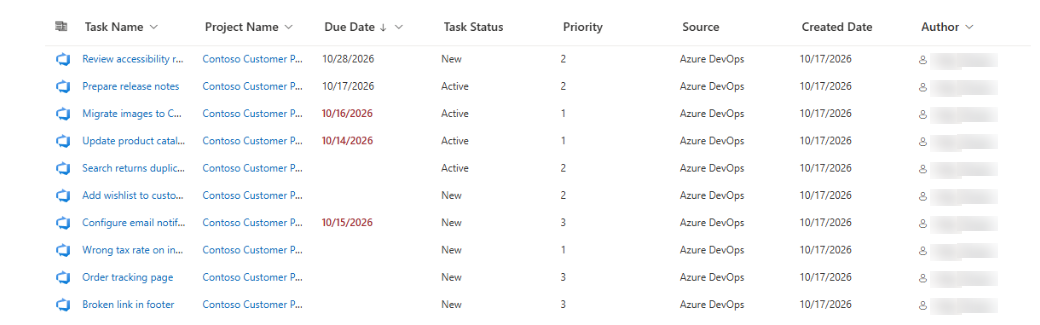
The My Tasks web part shows all your tasks from Planner, To Do, Outlook, SharePoint, Project Online and Azure DevOps in one list. Which columns that list has, and in which order, is decided by the page editor in the Columns group of the web part property pane. You tick the columns that should be visible and drag them into the order you need. The same settings apply to every user of the page.
This article describes the available columns, the difference between the plain and the linked variants, the default set, and which columns remain empty for which data source.
Before you start
- You need permission to edit the page where the web part is placed.
- The web part must already be added and configured. See KB10289. How to Add and Configure the My Tasks Web Part.
- The Columns group controls only the table on the page. The Excel export and the task details panel have their own fixed set of fields; see KB10296. How to Export My Tasks to Excel and KB10295. My Tasks: Viewing Task Details Without Leaving the Page.
How to choose and arrange columns
- Open the page and click Edit.
- Select the My Tasks web part and click the Edit web part (pencil) icon to open the property pane.
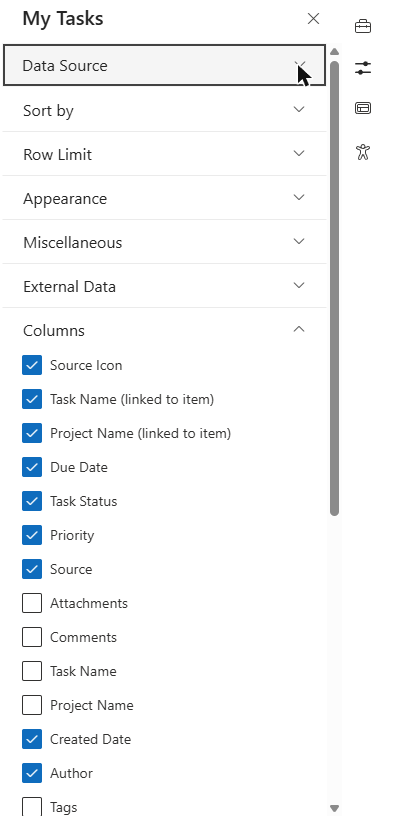
- Scroll down to the Columns group. It lists all available columns, each with a checkbox.
- Tick a column to show it, clear the checkbox to hide it.
- Drag a row up or down to change the position of the column. The column at the top of the list is the leftmost column in the task list.
- Click Save or Publish to make the new layout available to all users.
Clearing a checkbox does not delete anything. The position of the column is remembered, so if you tick it again later it returns to its place in the list.
Available columns
| Column | Content | Default |
|---|---|---|
| Source Icon | A small icon that shows where the task comes from (Planner, Outlook, To Do, Azure DevOps, SharePoint or Project) | On, first |
| Attachments | A paperclip icon with the number of attachments | Off |
| Comments | A chat icon with the number of comments | Off |
| Task Name | The title of the task as plain text | Off |
| Task Name (linked to item) | The title as a link that opens the original task in a new tab | On |
| Project Name | The project, plan, list or site of the task as plain text | Off |
| Project Name (linked to item) | The same name as a link to the project, plan or site, when the source provides an address | On |
| Created Date | The date the task was created | On |
| Due Date | The due date; overdue dates are shown in red | On |
| Author | The person who created the task, shown with a profile picture where the source provides one | On |
| Task Status | The status of the task | On |
| Priority | The priority of the task | On |
| Source | The name of the source as text, for example Planner | Off |
| Tags | The tags of the task in one cell | Off |
Plain and linked variants
Task Name and Project Name exist in two variants. The plain variant shows only text. The variant marked (linked to item) shows a clickable link. If a task has no address, the linked variant also shows plain text. Tick only one variant of each pair; ticking both shows the same text twice.
The link in the linked Task Name column and the double-click on a row both open the original task. The plain variant is useful when you want users to select a row without accidentally leaving the page.
Which columns are empty for which source
Not every source supplies every value. An empty cell is not an error.
| Column | Planner | To Do | Outlook | SharePoint / Project | Azure DevOps |
|---|---|---|---|---|---|
| Attachments, Comments | empty | empty | empty | empty | counts shown |
| Tags | empty | empty | empty | empty | tags shown |
| Author | shown | empty | empty | shown | shown |
| Due Date | if set | if set | if set | if set | if the work item has a due date |
For the description of the sources, see KB10290. My Tasks Data Sources: Planner, To Do, Outlook, SharePoint, Project Online and Azure DevOps.
📝 Note
The Author column is empty for To Do and Outlook tasks by design, because these tasks are personal and have no other author.
Default set and new columns
A newly added web part starts with these columns on: Source Icon, Task Name (linked to item), Project Name (linked to item), Created Date, Due Date, Author, Task Status and Priority.
When a new version of My Tasks introduces a new column, it is added automatically to the web parts that already exist on your pages. You do not need to reconfigure anything. The new column appears in the Columns group and can be ticked or moved like any other.
❗ Important
The column set is a setting of the web part and is the same for all users. A user cannot show or hide columns on their own; users can only filter and sort the list, and these personal choices are described in KB10293. My Tasks: Filtering, Sorting and Personal View Settings.
💡 Tip
For narrow page sections and for use in Microsoft Teams, keep only the columns that matter: Source Icon, Task Name (linked to item), Due Date and Task Status are usually enough. Fewer columns make the list easier to read on a phone. If you want the Due Date to stand out, see KB10292. My Tasks: Due Date Column, Overdue Highlighting and Quick Filters.