Policy Acknowledgement
The first-run wizard in Policy Admin prepares the policy storage and saves the initial configuration. Deploy the package first and use an account with the required setup permissions. See KB10497. Policy Acknowledgement: Requirements and Permissions.
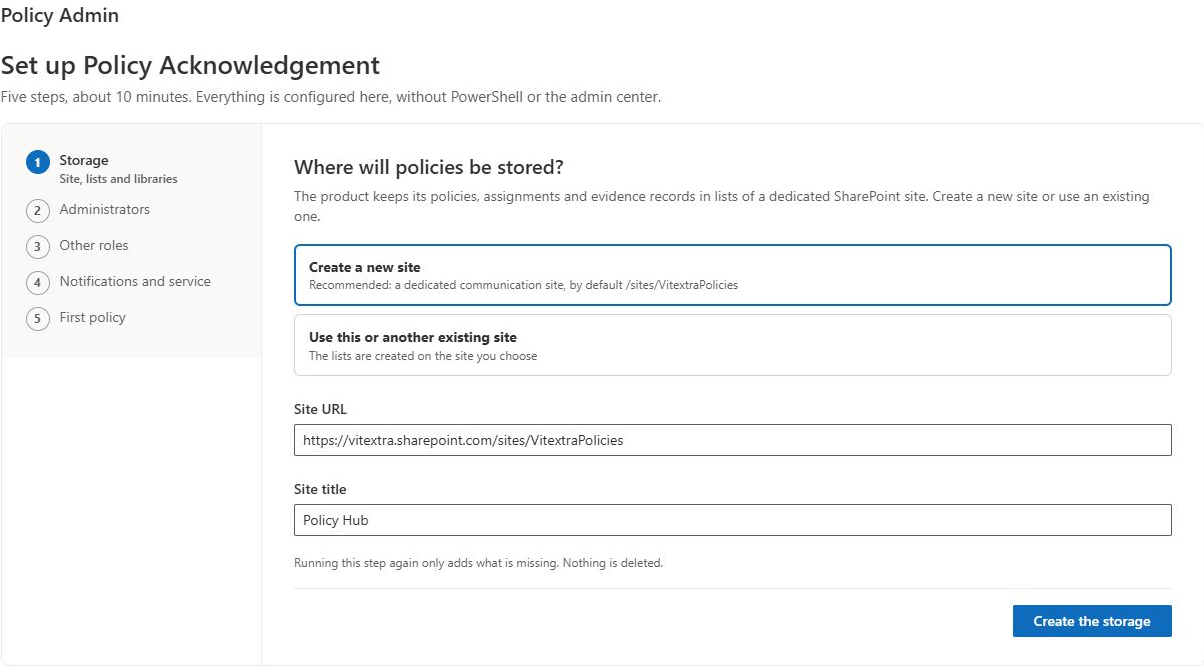
Create or select the storage site
- Add Policy Admin to a SharePoint page and open the wizard.
- Choose Create a new site or Use this or another existing site.
- Enter Site URL. The default location is
/sites/VitextraPolicies. For a new site, also enter Site title. - Select Create the storage and wait for site and list preparation to complete.
The wizard creates the solution's lists and library on the selected site. Repeating this preparation adds missing structures; it is not a command to delete existing policy data.
Assign administration and other roles
- Select the group that will administer the product and continue to the next step. The administrator role cannot be left empty.
- Assign groups for Compliance manager, Policy author and Auditor as required.
- Review the Employee audience. Use explicit groups if access must be limited to a defined pilot or business population.
- Set Managers see all direct and indirect reports according to whether managers should see indirect reports as well as direct reports.
- Continue and wait for permissions to be applied.
❗ Important
Make sure an intended administrator can use the selected group. The site-owner fallback ends after an administrator role is configured. Applying product permissions changes inheritance on the hub lists; review existing permissions when using a shared site. See KB10500. How to Configure Policy Acknowledgement Roles and Permissions.
Configure notifications and recording
Review the email and Teams options, quiet hours and sender. If a service has been provided, enter Reminder service URL, use Open the admin consent page and then Check the consent. Choose the recording mode under Who records acknowledgments. Without a connected service, automated reminders and escalations do not run.
If you change the recording mode after the wizard has applied role permissions, reapply permissions from the Roles tab after setup. See KB10509. Policy Acknowledgement Data Storage: Direct and Service Modes.
Choose the site deliberately
An existing site can be convenient when the policy application belongs with an established employee portal. However, the product lists receive their own role-based permissions. Review the site's owners, existing groups and administrative responsibilities before using it. Sharing a navigation location does not mean every member of the wider portal should have policy-management or evidence access.
A dedicated site gives you a clear place to record the hub URL and to manage the product's lists and pages. It still requires deliberate source access: a policy can point to content outside that site's libraries. Decide where documents will be maintained and who will keep their links and permissions usable after publication.
Use the site URL consistently across the pages you create later. Do not put a document URL or a reader-page URL into the hub field. The hub is the data location; the reader page is an interface that connects to it. Keeping those two addresses distinct avoids a common situation where a page opens successfully but loads records from an unexpected hub.
Validate role and notification decisions
Before advancing from the role steps, verify that an intended administrator actually belongs to the chosen group and can resolve that membership. Keep a record of the selected groups so that the configuration can be reviewed after setup. Do not assume the setup operator's continued access proves that every future administrator will have the same rights.
The option concerning a manager's whole reporting branch is stored in settings, but the current Team Compliance component offers both scope choices without enforcing that option. Verify actual access separately and consult KB10530. Team Compliance: How to Monitor Your Team and Follow Up before relying on this setting to restrict indirect-report visibility.
Treat the notification step as configuration, not delivery verification. If the external service is unavailable, finish the parts of the setup you can verify and document the unfinished service-dependent checks. Keep ordinary confirmation writing consistent with the selected mode and the applied permissions. Reapplying permissions after changing the mode is part of the configuration process, not a substitute for a successful employee test.
Resume safely after an interrupted setup
An interrupted wizard does not necessarily mean that nothing was created. Check the selected site, existing product lists and saved configuration before restarting from another page or creating a second site. The storage preparation can add missing components, but it should not be used as a reason to delete existing records.
Work out which stage failed: site access, structure creation, role lookup, permission application or service verification. Recheck that stage with the appropriate account. After recovery, verify both the saved configuration and a representative user action. A completed setup marker alone does not demonstrate that source documents, all page links or automatic notifications work.
Finish and verify
At the last step, use Import from a library to create initial drafts, or continue without importing. Select Finish the setup. The wizard does not create all employee and management pages for you: add and connect them as described in KB10499. How to Create Policy Acknowledgement Pages and Connect Web Parts.
Review installation state, then test access with an administrator and a pilot employee. Importing a document does not publish it or create an assignment.