My Tasks
Overview
The list in My Tasks shows only the most important columns. When you need more information about a task, you do not have to open the source application. Select the task and open the Task Details panel: it slides in from the side of the page and shows the properties of the task, including its description. You can read it, copy values, and then close it and carry on with your list.
Before you start
- The panel shows the data that the source (Planner, To Do, Outlook, SharePoint, Project Online or Azure DevOps) has supplied. Some fields exist only for certain sources, see below.
- My Tasks only displays tasks. You cannot change a task in the panel.
- The task list itself is described in KB10291. My Tasks: A Quick Guide for End Users.
How to open the details
- Click a task row once to select it. When you point at a row, a checkbox appears at its left side.
- In the command bar, click the Details icon (the round i) on the right-hand side. The icon is unavailable until a task is selected.
- The Task Details panel opens on the right.
- To close it, click the close icon in the panel header or click anywhere outside the panel.
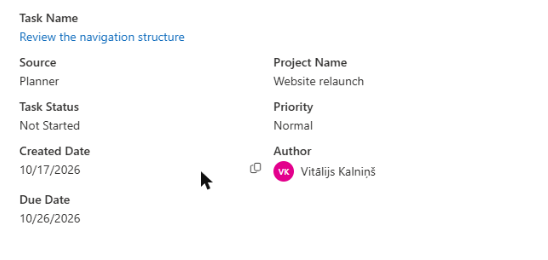
If you select another row while the panel is open, the panel shows the newly selected task. The panel does not block the page, so you can keep working with the list.
📝 Note
Only one task can be selected at a time. To open the task itself in its own application, double-click the row or press Enter; or select the row and click Open in New Tab in the command bar; or right-click the row and choose Open in New Tab.
What the panel shows
The first line is Task Name; it is a link that opens the original task in a new tab. Below it, the panel shows these properties:
| Property | Shown for | Notes |
|---|---|---|
| Source | All sources | For example Planner, To Do, Azure DevOps |
| Project Name | All sources | Plan, list, site or team project of the task |
| Task Status | All sources | The status as the source names it |
| Priority | All sources | The priority as the source names it |
| Created Date | All sources | In the date format of your browser |
| Author | If the source provides an author | Shown with the profile picture; not available for To Do and Outlook tasks |
| Item Type | Azure DevOps only | The work item type, for example Bug or Task |
| Due Date | All sources | Shown only when the task has a due date |
| Description | If the source supplies a description | See below |
Planner tasks do not show a description in the panel. For To Do, SharePoint and Azure DevOps tasks the description is shown when the task has one.
Copying values
When you point at the value of a property such as Source, Project Name, Task Status, Priority, Created Date, Due Date or Item Type, a small Copy icon appears next to it. Click the icon to place the value on the clipboard, then paste it into a message or a document.
The description
The Description is displayed as the source stores it. If the description contains formatting, such as bold text, lists or links, it appears formatted in the panel. The panel shows the description below the other properties.
For administrators
The details panel has a fixed set of properties and cannot be configured. The columns of the list can be chosen separately; see KB10294. My Tasks: Choosing and Arranging Columns.
💡 Tip
Keep the panel open and move through your list with the mouse: the panel follows the selected row, so you can quickly check descriptions of several tasks in a row. To see the same fields for many tasks at once, export the list; see KB10296. How to Export My Tasks to Excel.