Employee Directory
This article walks through the first steps with the Vitextra Employee Directory web part: adding it to a modern SharePoint Online page and configuring the main settings of the property pane - the data source, columns, sorting, page size, the search box and totals. At the end you will find an overview of the other property pane groups with links to the articles that cover them in detail.
Before you begin
Before you add the web part to a page, make sure that:
- The Employee Directory solution is installed in the tenant app catalog. The procedure is described in KB10035. How to Install a Vitextra Product in SharePoint Online.
- The Microsoft Graph permissions are approved. The solution requests the Directory.Read.All, User.Read.All, Presence.Read.All, Calendars.Read and People.Read permissions. A global administrator approves them on the API access page of the SharePoint admin center.
- You can edit the page - the Edit permission level or membership in the site's Members group is enough.
❗ Important
Until the Microsoft Graph permissions are approved, the web part cannot read data from Microsoft Entra ID: the Entra ID data source returns no people, and presence, availability and the People I work with quick filter do not work.
📝 Note
The solution contains two directory web parts: Employee Directory, described here, and Employee Directory (Entra ID), which adds a filter editor, exclusions and A–Z navigation. To decide which one fits your scenario, see KB10310. Employee Directory vs. Employee Directory (Entra ID): Which Web Part to Choose.
Adding the web part to a page
- Open the page and click Edit in the top-right corner.
- Hover over the place where the directory should go until a line with a + sign appears, and click it to open the web part toolbox.
- Type Employee Directory in the search box and select Employee Directory.
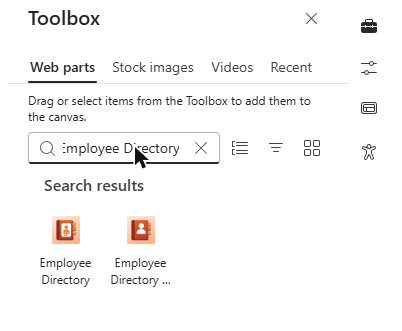
The web part appears on the page and immediately shows the employees of your organization using the default settings. To change the settings, click the pencil icon (Edit web part) on the left of the web part - the property pane opens on the right. Its groups are shown as an accordion: click a group name to expand it.
📝 Note
On sites with a non-English language the web part may appear in the toolbox under its localized name - for example, Справочник Сотрудников in Russian or Mitarbeiterverzeichnis in German.
Choosing the data source
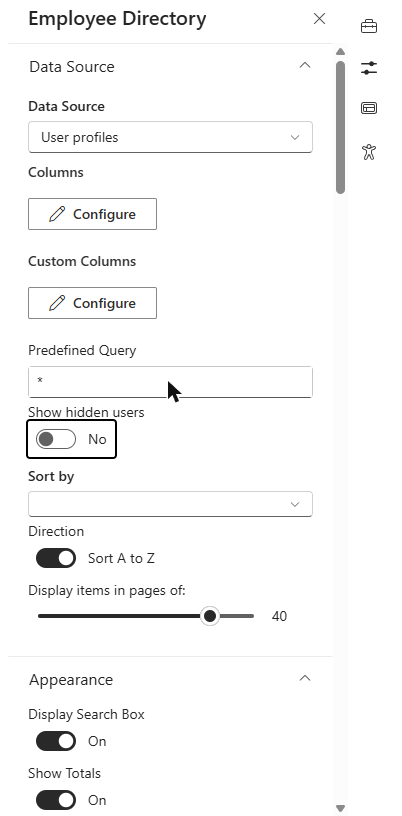
The first group of the property pane, Data Source, defines where the web part takes employee data from. Select one of the two values in the Data Source dropdown:
- User profiles (the default) - people are found through SharePoint search in the SharePoint user profiles. This source supports the predefined query (KQL), hidden profiles and the refinement panel.
- Entra ID (Azure AD) - people are read directly from Microsoft Entra ID through Microsoft Graph. Only enabled member accounts are shown; guest accounts are excluded.
The rest of the Data Source group changes depending on the selected source: some options are available only for User profiles, others only for Entra ID (Azure AD). These are described below.
💡 Tip
Choose User profiles when your directory relies on SharePoint profile properties, KQL queries or the refinement panel. Choose Entra ID (Azure AD) when the data in Microsoft Entra ID is the most complete and up to date, or when you need search by skills.
Columns and custom columns
Under the source selector there are two Configure buttons:
- Columns - opens the list of built-in employee properties (name, job title, department, phone numbers, office location and others). For each property you can choose whether it is shown in the list (Show in list) and on the person's card (Show on card), change its Caption and set its Order.
- Custom Columns - lets you add properties that are not in the built-in list: custom SharePoint user profile properties or custom Microsoft Entra ID attributes. Click Add new item, enter the property name and its caption, then save.
The configured columns are also used elsewhere in the web part: they are offered in the Content Fields of the cards and in the Group by dropdown.
💡 Tip
Step-by-step instructions for custom properties are in KB10049. How to Add Custom User Profile Attributes to the Employee Directory Web Part (User Profiles) and KB10060. How to Display Custom Entra ID Attributes in the Employee Directory Web Part (Microsoft Entra ID).
Options of the User Profiles source
When the source is User profiles, the Data Source group contains two more settings:
- Predefined Query - a KQL (Keyword Query Language) condition that is added to every search the web part runs, including the initial list. Use it to limit the directory to a part of the organization, for example
Department:"Sales"to show only the sales department or(Department:"Sales" OR Department:"Marketing")to show two departments. The default value*means no restriction. - Show hidden users - by default the web part does not show profiles that are hidden from address lists. Turn this option on to include them. Service accounts (such as app@sharepoint or Sync_DC_ accounts) are always excluded.
📝 Note
The predefined query is combined with whatever the user types in the search box, so people can only search within the part of the directory that the query allows. A query with a syntax error returns no results - test it on the page before publishing.
Options of the Entra ID source
When the source is Entra ID (Azure AD), the predefined query and Show hidden users are not available. Instead, the group contains the Show only users with non-empty department toggle. It is turned on by default, which hides accounts without a department - typically shared mailboxes, meeting rooms and technical accounts that are not real employees. Turn it off to show every enabled member account.
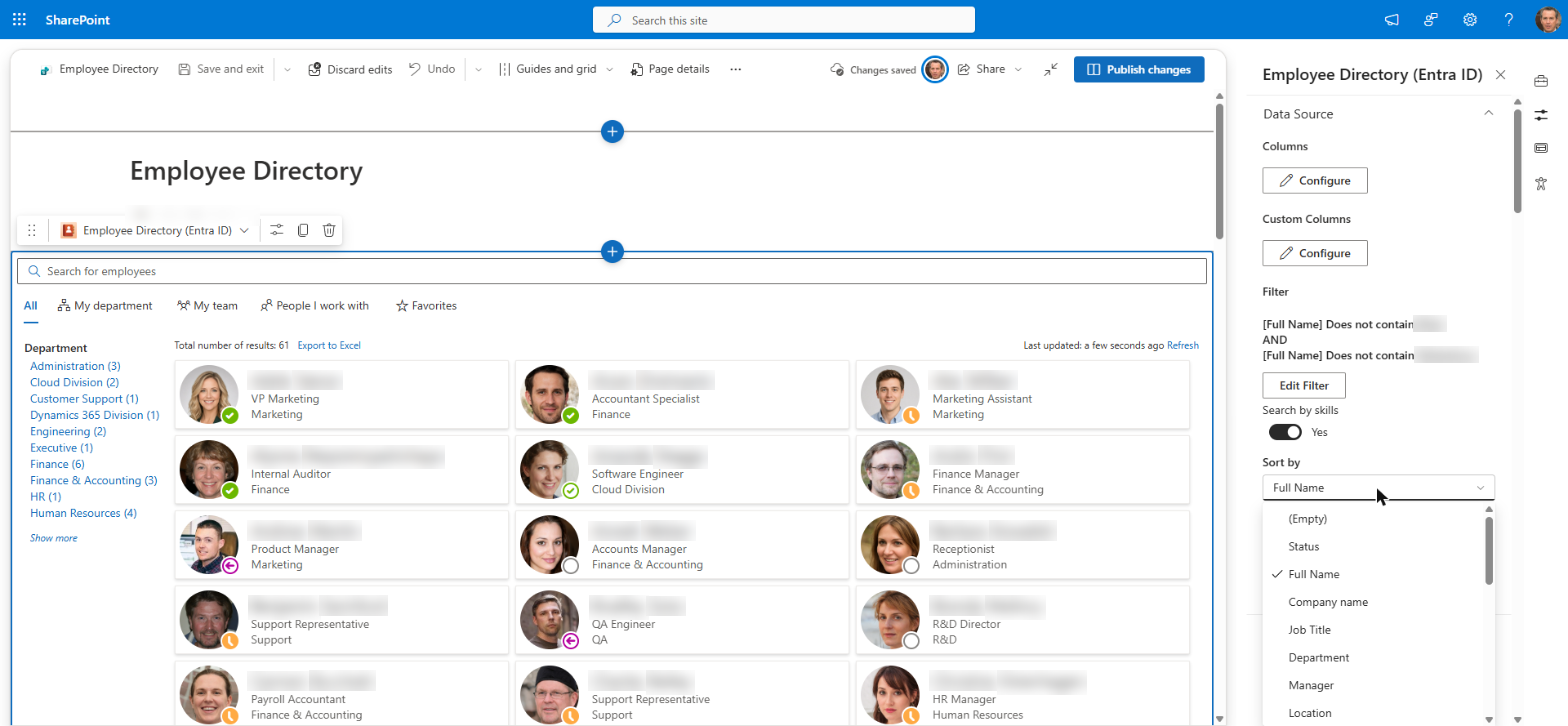
The Search by skills toggle, also in this group, adds people whose profile skills match the search text to the results. It is turned on by default and takes effect with the Entra ID (Azure AD) source. See KB10316. How to Search Employees by Skills in Employee Directory.
📝 Note
For more precise filtering by Microsoft Entra ID attributes - for example, by company, country or employee type, or to exclude unlicensed and disabled accounts - use the Employee Directory (Entra ID) web part. See KB10311. How to Configure the Employee Directory (Entra ID) Web Part: Filters, Exclusions and A–Z Navigation.
Sorting and page size
Three settings at the end of the Data Source group define the order of the results and how many are loaded at once:
- Sort by - the field the results are sorted by. The list of fields depends on the source: (Default), First Name and Last Name for User profiles; (Default) and Full Name for Entra ID (Azure AD). With (Default), User Profiles results are sorted by search relevance, and Entra ID results are returned in the order Microsoft Graph provides.
- Direction - Sort A to Z (the default) or Sort Z to A.
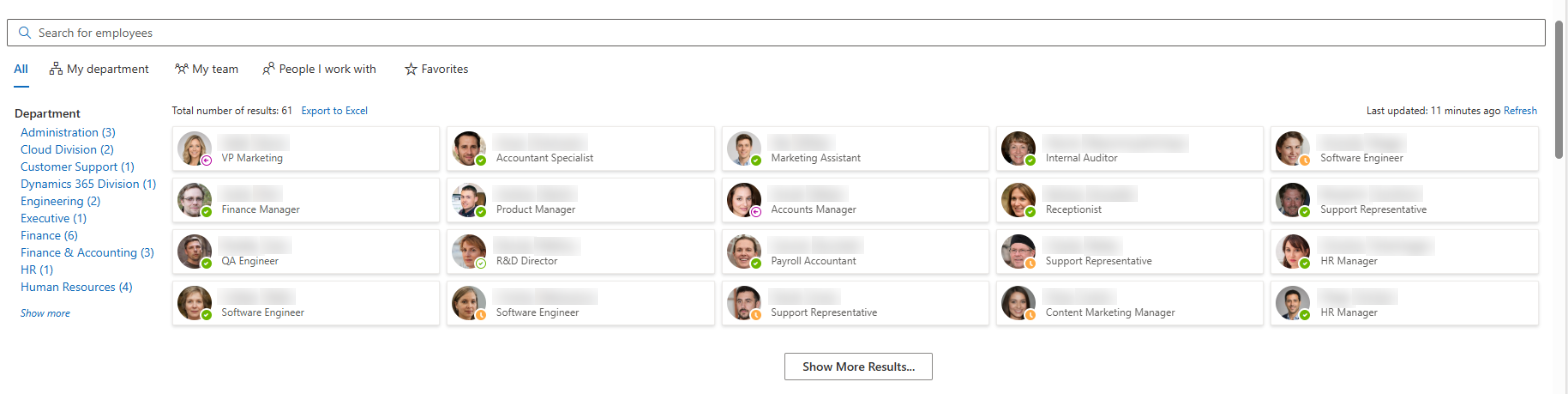
- Display items in pages of - how many people are loaded at a time, from 1 to 50 (the default is 40). When there are more results, a Show More Results... button appears under the list and loads the next portion.
💡 Tip
A smaller page size makes the first load faster on large directories; a larger one means users click Show More Results... less often. For directories of several thousand employees, a value between 20 and 40 is usually a good balance.
Search box and totals
Two toggles at the top of the Appearance group control the elements above the results:
- Display Search Box - shows or hides the search box. Turn it off when the web part should show a fixed list, for example the members of one department defined by the predefined query.
- Show Totals - shows or hides the number of people found.
Both are turned on by default.
Other settings
The remaining groups of the property pane are described in separate articles:
| Group | What it configures | More information |
|---|---|---|
| Appearance | The view (Details or Contact cards), Group by, card Size and Compact List | KB10314. Employee Directory Layouts: Details and Cards, Card Size, Card Fields and Group By |
| Quick Filters | Which quick filters are shown: My department, My team, People I work with, Favorites | KB10214. Employee Directory Quick Filters: My Department, My Team, People I Work With, Favorites |
| Content Fields | The fields shown on each card (available in the Contact view) | KB10314. Employee Directory Layouts: Details and Cards, Card Size, Card Fields and Group By |
| Panel | The sections of the details pane: manager, direct reports, availability, local time and working hours, documents, about me, interests, skills | KB10199. Employee Directory: Customizing the Details Pane, KB10317. Employee Directory: Local Time, Working Hours and Availability |
| Context Menu and Quick Actions | Which actions are offered in the context menu and as buttons on the card: chat, call, email, copy email, schedule a meeting, vCard | KB10315. Employee Actions in Employee Directory: Chat, Call, Email, Copy Email, Schedule a Meeting and vCard |
| Export | Export of the results to a Microsoft Excel spreadsheet | KB10062. How to Export Employee Directory Results to Microsoft Excel |
| Refinement Panel | The panel with refiners and its position (only for the User profiles source) | KB10313. How to Set Up the Refinement Panel in Employee Directory |
| Personal app (Microsoft Teams) | Save Settings saves the current configuration as the tenant default used by the Employee Directory personal app in Microsoft Teams | - |
| About | License status and product information | KB10206. Vitextra Licensing and Account: How to Buy and Activate a License |
📝 Note
The Refinement Panel group is shown only when the source is User profiles. The Personal app (Microsoft Teams) group is not shown when the page is opened inside Microsoft Teams.
Saving the page
The settings take effect on the page as soon as you change them, so you can check the result before publishing. When the directory looks as expected, click Republish (or Publish for a new page) to make the changes visible to everyone.
💡 Tip
To give the directory a page of its own, without other web parts, see KB10040. How to Create a Single App Page with Vitextra Employee Directory.